How Can We Help?
Noor comes with a powerful typography options, one of these options is the source of the font that you will use.
Source options that Noor support
- Theme Defaults – with use the default fonts that come with the theme.
- Standard Fonts – you can choose one of the browser standard fonts,15+ font.
- Google Fonts – you can choose one from over +800 google fonts.
- FontFace.me Fonts – choose one from +150 FontFace fonts.
- Any external fonts (e.g. Typekit) – add your custom font, it’s useful if you pay a new font and want to add this font to your site.
How to Add a New Font
Step 1 – Upload the font files to the server. ( you should upload EOT, WOFF, WOFF2 and other fonts via FTP )
Step 2 – Navigate to WP admin → Appearance → Customize → Additional CSS and add this code:
For more you can check the full article here How to Add Customs CSS.
@font-face {
	font-family: "FontName";
	src: url("http://yoursite.com/fonts/fontname.eot");
	src: url("http://yoursite.com/fonts/fontname.eot?#iefix") format("embedded-opentype"),
	url("http://yoursite.com/fonts/fontname.woff") format("woff"),
	url("http://yoursite.com/fonts/fontname.ttf") format("truetype"),
	url("http://yoursite.com/fonts/fontname.svg#fontname") format("svg");
}
Replace the FontName with the font name you will use. Also, replace the paths of the fonts files.
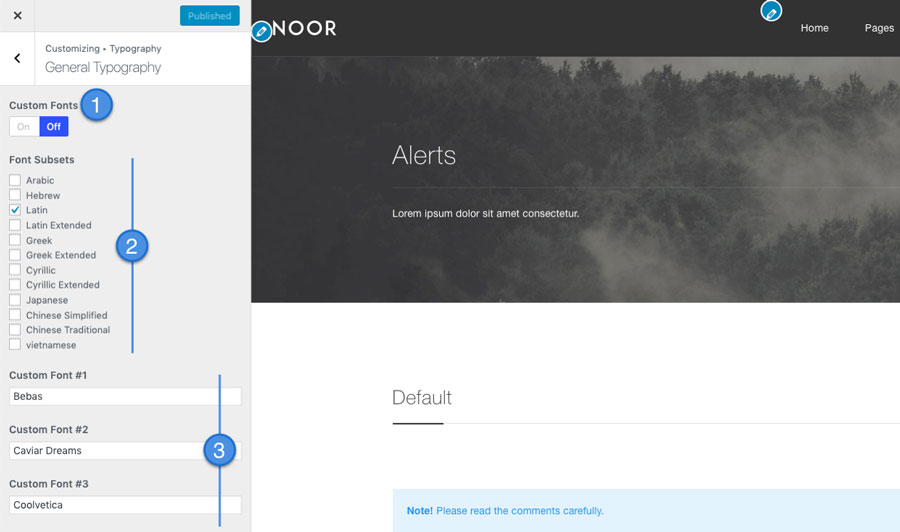
Step 3 – Navigate to WP admin → Appearance → Customize → Typography → General Typography and make the custom font on.
Step 4 – Enter the

1- Custom Fonts – Active it to use custom font.
2- Font Subsets – Latin charset by default. Include additional character sets for fonts (make sure at http://www.google.com/fonts/ before that charset is available for the chosen font).
3- Custom Font – enter the FontName that you add in the preceding code.
How To Use The New Custom Font
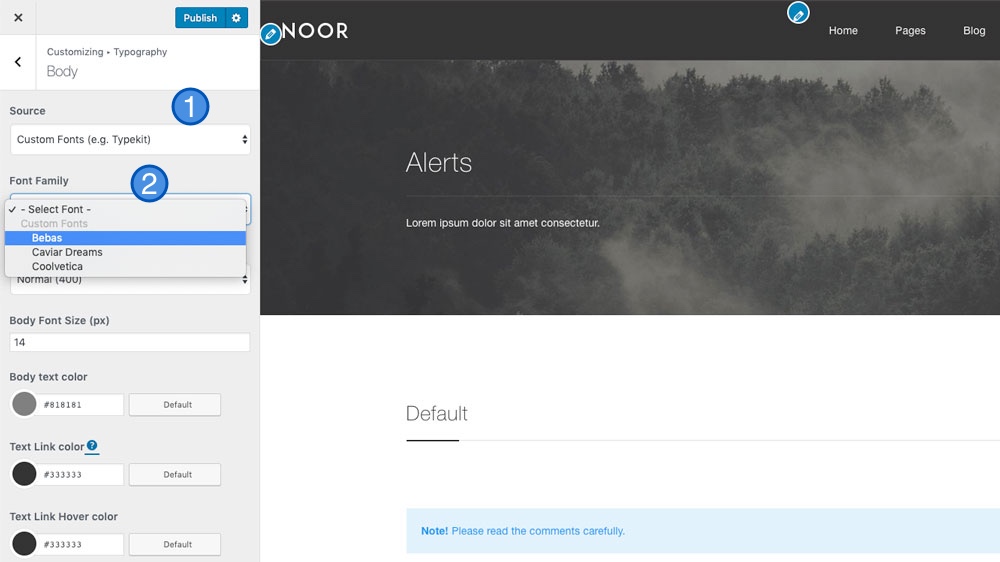
Once you’ve added the new custom font to their respective fields (Custome Font #1, Custome Font #2, Custome Font #3), click the ‘Publish’ button then refresh the page. After you refresh the page, you will now be able to select your new custom fonts. They will be listed under ‘Custom Fonts’ on any Font Family option dropdown.

1- Source – choose Custom Fonts (e.g. Typekit).
2- Select your new custom fonts.