How Can We Help?
if you cannot get the demo content to import, you can then import elements manually. this tutorial shows how to manually import demo content.
Check The Following Plugins Before Import
- DIMA Shortcodes: This plugin is required to run OKAB. It provides all the shortcodes used in OKAB.
- Slider Revolution: Create responsive sliders with must-see-effects, all while maintaining your search engine optimization.
- Contact Form 7: Free simple and flexible contact form, the theme is compatible with this plugin, you can check how to use Contact Form 7 Here
Demo Files Location
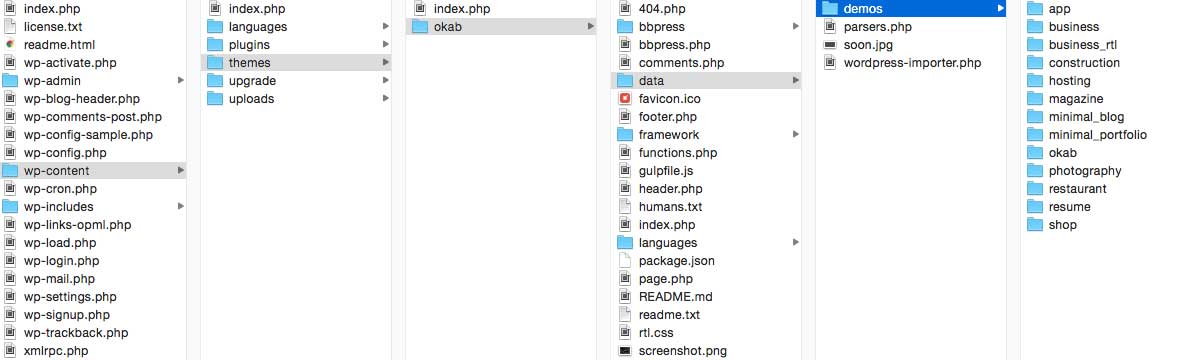
You must log in to your FTP server in order to locate OKAB demos file, navigate to wp-content > themes > okab > data > demos, inside the demos folder you will find all the demos files, each folder has its proper demo, each one has XML file and two JSON files which are widget_data.json and okab-customizer.json.
Importing XML Files
Step 1 – Go to Tools tab in your admin sidebar and click Import.
Step 2 – On the Import page, select WordPress from the list and install the WordPress Importer Plugin.
Step 3 – Click Choose File, then choose the content.xml file from your desired demo folder. For example, if you would like to install the Magazine Demo, you would install the content.xml inside the magazine folder.
Step 4 – Once you’ve chosen the correct file, click the Upload File and Import button.
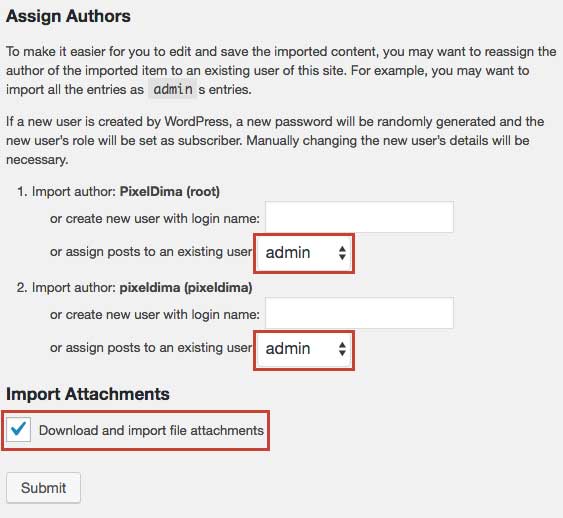
Step 5 – Select admin in the dropdown list, and don’t forget to check the ‘Download and Import File Attachments’ checkbox.
Step 6 – Wait until WordPress is finished importing, then click the Have Fun link to return to your dashboard.
Importing Widget Data
Step 1 – Install and activate the Widgets Settings Importer/Exporter plugin developed by Voce Communications.
Step 2 – In the Tools tab of your WordPress admin sidebar, select the Widget SettingsImport option.
Step 3 – Click the Select A File button, and select the widgets_data.json file from the same folder you got the XML and theme option files you’re just imported.

Step 4 – Once you’ve selected the correct file, click Show Widgets Settings.
Step 5 – Click the Select All Active Widgets button first, then click the Import Widget Settings button.
Step 6 – You will receive a success message letting you know you’ve successfully imported the widget settings.
Importing Customizer Data
Step 1 – Navigate to OKAB main tab
Step 2 – Select the Customizer Backup tab
Step 3 – In the Import section click the Choose file button, and select the okab-customizer.json file from the same folder you got the XML and Widget Settings files.
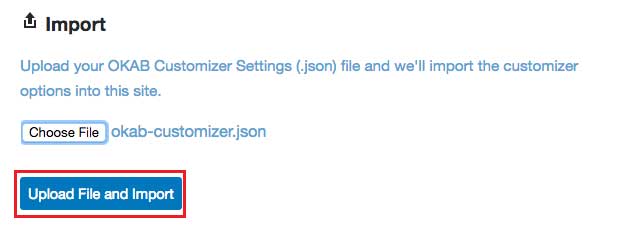
Step 4 – Once you’ve selected the correct file, click Upload File and Import.